
Philodendron Tortum: The Complete Care Guide
Tags: fernleaf philodendron, how to grow philodendron tortum, philodendron tortum, philodendron tortum care, philodendron tortum moss pole, philodendron tortum problems, philodendron tortum variegated, skeleton philodendron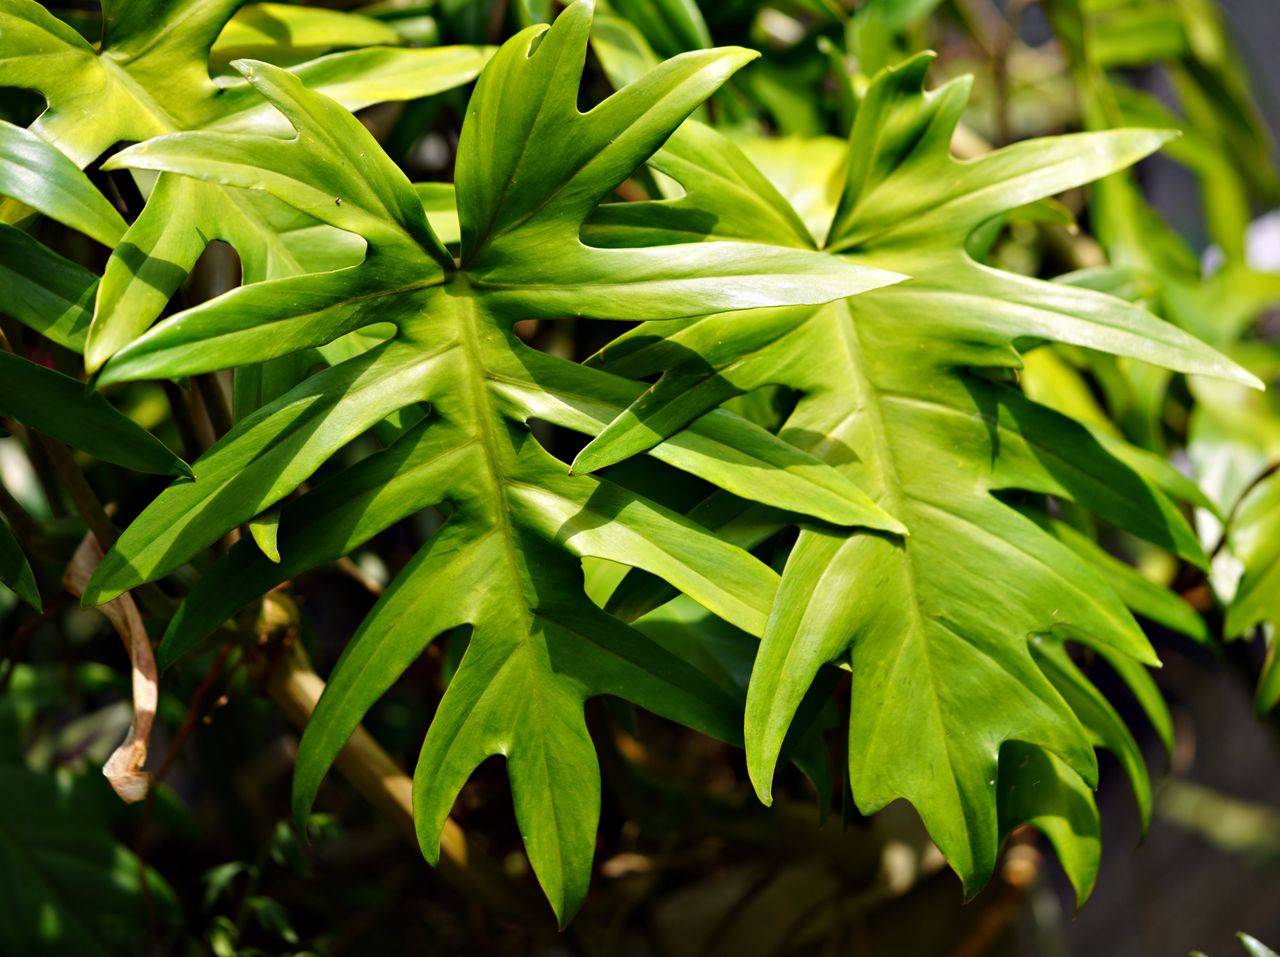
There are thousands of Philodendron species. Most of them — beautiful as they are — share a certain visual vocabulary: broad, glossy, heart-shaped or lobed leaves in rich tropical green. You know the type.
And then there is Philodendron tortum.
Nothing prepares you for the first time you see one. Where other philodendrons grow leaves, P. tortum grows something that looks more like an architectural blueprint — deeply divided, almost skeletal fronds on spiraling dark stems, each leaflet so precisely cut it appears sculpted rather than grown. It doesn’t look like a plant that belongs on a windowsill. It looks like something that belongs in a botanical museum exhibit labeled “Rare Specimen, Amazon Basin.”
Which is, essentially, exactly what it is.
This guide covers everything: the plant’s fascinating origin story, complete care requirements, the juvenile-to-mature transformation no one adequately explains, variegated form care, the propagation techniques most guides skip, common problems diagnosed precisely, and the buying guide that tells you where to source one at a fair price in the USA in 2026.
Table of Contents
- What Is Philodendron Tortum? Origin, Discovery & Why It’s Different
- Philodendron Tortum Identification: Juvenile vs. Mature Leaves
- Philodendron Tortum Variegated: The Rarest Form
- Light Requirements: Natural & Artificial Settings
- Watering Philodendron Tortum Correctly
- Humidity: What It Actually Needs vs. What Guides Claim
- Soil & Potting Mix (The Aroid Formula That Works)
- Temperature & Placement
- Fertilizing for Maximum Leaf Size
- Moss Poles, Climbing & The Leaf Size Secret Nobody Tells You
- The Wall-Climbing Warning (Read Before You Mount)
- Propagation: All 3 Methods Covered
- Repotting & Root Care
- The “Leafless Vine” Problem & The Chop-and-Prop Solution
- Philodendron Tortum Problems: Complete Diagnosis Guide
- Pests: What to Watch For
- Philodendron Tortum Price Guide & Where to Buy in the USA
- Frequently Asked Questions
1. What Is Philodendron Tortum? Origin, Discovery & Why It’s Different
The Botanical Discovery Story
Philodendron tortum was formally documented in botanical science only in 2001 — described by Brazilian botanists M.L. Soares and Simon Mayo based on specimens collected in the Adolpho Ducke Forest Reserve near Manaus, in the heart of the Brazilian Amazon. This makes it one of the more recently formally classified aroids in its genus, even though the plant had been present in the rainforest all along — simply overlooked in the botanical record amid the extraordinary density of Amazonian biodiversity.
Its scientific name tells its own story: Philodendron comes from the Greek philo (love) and dendron (tree) — referring to the plant’s tree-climbing behavior. Tortum comes from the Latin torquere, meaning “to twist” — a direct reference to the plant’s signature spiraling, corkscrew-like petioles (leaf stalks) that give it such an architectural, almost alien appearance.
Common names in circulation include Skeleton Philodendron, Fernleaf Philodendron, and Corkscrew Philodendron — each capturing a different aspect of its distinctive form.
Natural Habitat
In the wild, P. tortum grows in the lowland tropical rainforests of northern Brazil and Bolivia — specifically in the understory of dense forest where light filters through multiple canopy layers before reaching the plant. It begins life as a juvenile on the dimly lit forest floor, then climbs aggressively onto any available vertical structure — fallen logs, tree trunks, rocky outcroppings — spiraling upward toward brighter light, with each new leaf emerging larger and more deeply divided as the plant matures.
This growth behavior (technically called hemiepiphytic — starting in soil and transitioning to climbing) is the single most important piece of information for understanding how to grow P. tortum well indoors.
Why It’s Trending in 2026
P. tortum has gone from niche collector specimen to genuinely mainstream over the past 3–4 years in the US houseplant market. Costa Farms now lists it in their Trending Tropicals collection. Home Depot stocks it in some regions. The reason: nothing else looks like it. In an era where every plant collection seems to feature the same five varieties, P. tortum is the conversation-stopper — the plant guests ask about first.
2. Philodendron Tortum Identification: Juvenile vs. Mature Leaves
This is one of the most consistently under-explained aspects of P. tortum care, and it directly affects expectations around what your plant “should” look like at different stages.
Juvenile Stage
Young P. tortum plants — typically the first 5–10 leaves — produce foliage that looks almost nothing like the mature form. Juvenile leaves are:
- Smaller and more oval to elongated in shape
- Entire or with only shallow, poorly formed lobes
- Not deeply divided or skeletal in appearance
- Sometimes described as “disappointing” by new owners who expected the dramatic mature form immediately
This is completely normal. Do not assume you received the wrong plant. Every P. tortum begins as a relatively unremarkable-looking plant and transforms dramatically as it matures and, critically, as it begins to climb.
Mature Stage
As the plant matures and (especially) begins climbing, the foliage transforms:
- Leaves become dramatically larger — up to 15–25 inches long by 19–24 inches wide on vigorous climbing specimens
- Deep, precise divisions develop along the leaf margins, creating the signature skeletal/fernleaf appearance
- Petioles become distinctly twisted and spiraling
- Leaf color deepens to a rich, glossy dark green with a pale undersurface
- New leaves emerge tightly coiled in a spiral before unfurling — one of the most captivating displays in the houseplant world
The transformation is directly accelerated by climbing. A P. tortum allowed to climb a moss pole will develop mature foliage significantly faster than one left to trail or hang. This is the most important practical takeaway from understanding the juvenile-to-mature transition.
3. Philodendron Tortum Variegated: The Rarest Form
The variegated form of P. tortum is one of the rarest and most sought-after plants in the US collector market in 2026.
What It Looks Like
Variegated P. tortum displays the same deeply divided skeleton leaf form as the standard green variety, but with irregular splashes, sections, and marbling of creamy white, pale yellow, or mint-cream variegation across the leaf surface. Because variegation is distributed throughout the same deeply divided foliage, the visual effect is extraordinary — a white-and-green botanical lacework that commands immediate attention in any plant collection.
A related collector hybrid — Philodendron Florida Beauty × Tortum — combines the variegated coloration of Florida Beauty with the skeletal leaf form of tortum, producing striking results in both green and variegated forms.
Care Differences from the Standard Form
Higher light requirement: Variegated sections contain significantly less chlorophyll than green sections. The plant compensates by needing more overall light to produce sufficient energy for growth. Bright indirect light is non-negotiable for variegated tortum — medium or low light causes slow growth, reversion toward greener leaves, and poor plant health.
Slower growth: All heavily variegated plants grow more slowly than their fully-green counterparts due to reduced chlorophyll. Patience is essential — don’t interpret slow growth as a care problem.
Unstable variegation: The variegation pattern is not genetically stable in the same way as in some other variegated plants. New leaves may emerge more or less variegated than previous ones. High light maintains the best variegation expression; low light causes reversion toward solid green.
Higher price: See Section 17 (Price Guide).
4. Light Requirements: Natural & Artificial Settings
Natural Light
P. tortum thrives in medium to bright indirect light — replicating the filtered, multi-canopy light of its natural rainforest understory habitat.
Optimal natural light positions:
- East-facing windows: Ideal. Gentle morning direct sun followed by bright indirect light throughout the day.
- West-facing windows: Good. Bright indirect light in the morning; direct afternoon sun filtered by a sheer curtain avoids leaf burn.
- South-facing windows (USA): Excellent light intensity — position 2–4 feet away from the window or filter with a sheer curtain to prevent direct sun exposure, which causes bleaching and brown patches.
- North-facing windows: Marginally adequate. P. tortum survives in north-facing light but growth is slow and mature leaf development is significantly delayed. Supplemental grow lighting is strongly recommended.
Direct sun tolerance: P. tortum can tolerate up to 2–3 hours of direct sun in morning or evening light (less intense than midday direct sun). More than 3 hours of direct sun — particularly afternoon sun in the southern US — causes leaf bleaching, brown patches, and dried-out leaf edges.
Grow Light Settings (The Specs Competitors Don’t Give You)
Most guides just say “you can use grow lights” without telling you how. Here are the actual target metrics:
Minimum adequate light: 200–400 foot-candles (FC) / 40–80 μmol/m²/s PPFD for 12 hours per day. This produces slow but healthy growth.
For faster growth and larger leaves: 600–800 FC (120–160 μmol/m²/s PPFD) for 14–16 hours per day. This produces substantially better growth rates and larger leaf development.
Light type: Full-spectrum white LED grow lights significantly outperform red/blue “blurple” lights for overall plant quality and are far more aesthetically compatible with home environments. See our complete grow lights guide for specific product recommendations at every budget.
Important: P. tortum does not have a critical photoperiod requirement for vegetative growth — keeping it on 24-hour lighting for time-lapse purposes causes no harm, though 12–16 hours with a dark period is standard practice.
5. Watering Philodendron Tortum Correctly
When to Water
P. tortum prefers to partially dry between waterings — not bone dry, but not consistently moist either. The target:
Water when the top 1–2 inches of substrate are dry to the finger test. At deeper levels (3–4 inches in larger pots), the soil can still be slightly moist. This “partially dry” approach prevents the chronic wetness that causes root rot while ensuring the plant never reaches severe drought stress.
Seasonal adjustment:
- Spring/Summer (active growth): Check every 5–7 days; water when the 1–2 inch mark is dry.
- Fall: Extend to every 7–10 days.
- Winter: Every 10–14 days minimum. P. tortum does not go fully dormant but significantly reduces water intake during low-light, cool winter conditions.
What not to do: Watering on a rigid calendar schedule. Environmental variables (temperature, light intensity, pot size, season) affect how quickly the soil dries significantly. Always check before watering. For the complete plant-responsive watering framework, see our guide to watering indoor plants.
How to Water
Water thoroughly — slowly saturate all parts of the soil until excess water flows freely from the drainage holes. Do not water a little at a time, which keeps only the surface moist while deeper roots remain dry.
Water quality: P. tortum is not particularly sensitive to municipal tap water minerals (unlike Calatheas or maidenhair ferns), but room-temperature water is preferable to cold tap water, which can shock tropical roots. If your tap water is heavily chlorinated, allowing it to sit overnight before use is a simple improvement.
Overwatering: The Most Common Fatal Mistake
Overwatering — keeping the soil chronically wet — causes root rot in P. tortum just as in most aroids. Key warning signs: yellowing lower leaves, soft or mushy stems at the base, a sour smell from the soil. If caught early, reduce watering and improve drainage. If root rot is advanced, unpot, trim rotted roots, repot in fresh dry aroid mix. For the full root rot rescue process, see our repotting guide.
6. Humidity: What It Actually Needs vs. What Guides Claim
Most guides list P. tortum as requiring “60–80% humidity” — placing it in the same category as Calatheas and maidenhair ferns. The reality is more nuanced and more manageable.
P. tortum prefers above-average humidity but tolerates average home conditions reasonably well — particularly when it receives adequate, consistent watering. This distinguishes it meaningfully from moisture-critical species like Calathea and maidenhair fern, where low humidity causes rapid visible decline.
Target: 50–70% relative humidity for optimal growth and largest leaf development.
Tolerated: 40–50% relative humidity (typical well-maintained American home) — the plant survives and grows, but leaf size may be smaller and growth somewhat slower than at higher humidity.
Problematic: Below 30% — common in American homes during winter heating season. At this level, brown leaf tips, curling leaves, and slowed growth appear. A small humidifier running near the plant during winter heating months resolves this effectively.
Practical approach for US growers:
- If your home maintains 40–50% humidity naturally, P. tortum will likely do fine without intervention during most of the year.
- During winter heating season, a small humidifier placed nearby prevents the most common humidity-related problems.
- Keeping the moss pole consistently moist (if using one) also contributes meaningful localized humidity — the aerial roots benefit directly from the moist moss.
7. Soil & Potting Mix
P. tortum is an aroid — like Monstera, Philodendron, and Pothos — and does best in a well-aerated, chunky, organically rich mix that drains freely while holding adequate moisture.
The Recommended Aroid Mix
Formula: 3 parts quality potting mix (coco coir or peat-based) + 1 part perlite + 1 part orchid bark or bark chips.
This blend provides:
- Good moisture retention without waterlogging
- Excellent aeration (bark chips and perlite prevent compaction)
- The organic matter content aroids naturally prefer
Alternative for simplicity: Equal parts potting mix, perlite, and orchid bark (1:1:1). Slightly chunkier and more free-draining — excellent for environments where overwatering is a risk.
Substrate pH: Slightly acidic to neutral (6.1–7.3). Standard commercial potting mixes fall in this range naturally.
Can P. tortum grow in sphagnum moss alone? Yes — it adapts well to pure sphagnum moss culture, which is widely used by collectors. The trade-off: moss requires more careful watering management (it stays moist for longer and can become anaerobic if packed tightly) and needs nutrient supplementation through regular fertilizing since moss provides minimal inherent nutrition.
For pot material guidance, see our best planters and pots guide. Use a pot with drainage holes — this is non-negotiable for an aroid that is sensitive to root rot.
8. Temperature & Placement
Ideal temperature range: 60–85°F (15–29°C) — encompassing standard US home temperatures year-round.
Lower limit: 55°F (13°C). Below this, growth slows dramatically and cold damage to leaves and roots becomes a real risk. During US winters, ensure the plant is not near cold drafts from windows, exterior doors, or air conditioning vents.
Upper limit: Most US home temperatures don’t approach the upper threshold concern. However, in very warm, sunny rooms above 85°F, ensure the plant receives adequate water to compensate for increased transpiration.
Best placement for most US homes:
- Bright living room near an east or south-facing window, with distance or curtain filtering to prevent direct sun
- A well-lit home office with east or west window exposure
- Any room where you can maintain the target temperature range year-round without significant draft exposure
9. Fertilizing for Maximum Leaf Size
This is where most guides give generic advice. Here’s what actually drives the best leaf development in P. tortum:
The Right Fertilizer Ratio
Since you’re growing P. tortum primarily for its extraordinary leaves, a high-nitrogen fertilizer with an NPK ratio of approximately 3-1-2 (nitrogen-phosphorus-potassium) produces better results than a balanced 1-1-1 ratio. Nitrogen drives vegetative growth — larger leaves, more vigorous new leaf production, richer green coloration.
Common 3-1-2 ratio products available in the US include:
- Dyna-Gro Foliage Pro (9-3-6) — a widely trusted aroid fertilizer in US plant communities
- Jack’s Classic All Purpose (20-20-20) is also fine for general use
For variegated tortum: Use a balanced fertilizer at half strength rather than nitrogen-heavy — excessive nitrogen on heavily variegated plants can cause reversion toward green.
Schedule
Active growing season (March–September): Every 2–4 weeks with good light. With very high light (800+ FC from grow lights), you can fertilize with every watering at a diluted concentration.
Fall: Every 4–6 weeks.
Winter: Reduce to every 6–8 weeks or pause altogether during very low-light, slow-growth periods.
Important: Always water the plant before fertilizing. Never apply fertilizer to dry soil — concentrated fertilizer salts contacting dry roots cause burn.
10. Moss Poles, Climbing & The Leaf Size Secret Nobody Tells You
This is the most practically impactful section in this entire guide — and the one most competitor articles handle most superficially.
Why Climbing Changes Everything
In nature, P. tortum climbs aggressively. As it climbs, its leaves undergo a dramatic transformation: they get larger, more deeply divided, and more distinctly mature in form. This is called metamorphism in aroids — the same plant produces completely different-looking leaves at different growth stages and climbing heights.
The key insight: the single most effective thing you can do to produce the large, dramatically divided mature leaves is give P. tortum something to climb.
A P. tortum trailing in a hanging basket produces relatively small, less divided leaves. The same plant on a well-maintained moss pole produces leaves 2–3× larger with dramatically deeper division. This isn’t a small difference — it’s the difference between a mildly interesting plant and a genuinely spectacular one.
Setting Up Your Moss Pole
Moss pole diameter: 2–4 inches. Wider poles provide more surface area for aerial roots to attach and draw moisture from.
Critical detail: keep the moss moist. The aerial roots of P. tortum actively seek moisture — they will attach to and draw from a damp moss pole, which accelerates climbing and significantly contributes to humidity at the root zone. A dry moss pole that the aerial roots can’t grip or hydrate from provides far less benefit than a consistently moist one.
How to keep it moist: Fill a spray bottle with water and soak the pole thoroughly every 1–2 days, or install a self-watering moss pole system (increasingly available from US plant accessory retailers). Alternatively, pack the moss pole tightly with live sphagnum moss rather than dried — live sphagnum retains moisture significantly longer.
Training the stems: Use soft plant ties, velcro plant tape, or small clips to gently attach stems to the pole at intervals. As aerial roots make contact with the moist moss and begin growing into it, the plant will self-attach and climbing becomes self-directed.
The Shrub Alternative
Some collectors — including experienced P. tortum growers — prefer to maintain the plant in a bushy, mounding form rather than training it vertically. This is achieved by regularly propagating the growing tips (chop-and-prop, described in Section 14) and keeping the plant compact. The trade-off: leaves stay smaller and less dramatically divided than on a climbing specimen, but the overall plant has a different, lush aesthetic that some prefer.
11. The Wall-Climbing Warning
If you consider letting your P. tortum climb a wall in your home, read this first.
P. tortum’s aerial roots actively grip and adhere to surfaces as they climb — including painted walls, wallpapered walls, and finished surfaces. If the plant is allowed to root into a wall and subsequently needs to be removed, the roots can tear paint, damage wallpaper, and leave behind adhesion marks that require repainting to fix.
This is not hypothetical — it’s documented by multiple growers who have had to perform wall repairs after removing a climbing specimen.
Safe wall-climbing alternatives:
- Mount a large plank of natural wood (cedar, pine, or cork board) to the wall and train the plant on the wood surface — the roots grip into the wood naturally without damaging the wall behind.
- Use a freestanding moss pole or trellis that allows tall climbing without any wall contact.
- Install a tension rod system in a corner, strung with cord or wire for the plant to climb on — easily removable.
12. Propagation: All 3 Methods Covered
Most guides cover only water or soil propagation. Here are all three methods P. tortum responds to.
Method 1: Water Propagation (Most Beginner-Friendly)
Step 1: Take a stem cutting with at least one node (the growth point from which roots and new growth emerge) and 1–2 leaves. Cut just below a node with clean, sharp scissors.
Step 2: Remove any leaves that would be submerged in water.
Step 3: Place in room-temperature water in a bright indirect light location. Change water every 5–7 days.
Step 4: Roots typically emerge within 2–4 weeks. Transfer to soil when roots reach 1–2 inches.
Note: Even leafless node sections will root and produce new growth when propagated in water — this makes pruning waste productive. Any segment with a node is a potential new plant.
For a full propagation station setup guide, see our DIY propagation station guide.
Method 2: Sphagnum Moss Propagation (Fastest Root Development)
The preferred method of serious collectors for P. tortum — produces faster, stronger root systems than water propagation.
Step 1: Prepare a sealed propagation box (a clear plastic storage container with a lid works perfectly) with a shallow bed of moist sphagnum moss — approximately 1 inch deep.
Step 2: Lay node cuttings (with or without leaves) on or slightly into the moist moss. The nodes should be in contact with the moss.
Step 3: Close the lid. Place in bright indirect light — 100–200 FC is sufficient for propagation; the cutting doesn’t need high light while establishing roots.
Step 4: The sealed container retains moisture, eliminating the need for frequent attention. Check every 1–2 weeks. Roots typically develop within 3–6 weeks.
Step 5: Once roots are established and (if leafless) new growth points are emerging, transfer to aroid mix in a small pot.
Advantage over water propagation: Moss-propagated roots are structurally closer to soil roots — the transition to soil is smoother and survival rates are higher than for roots developed in water.
Method 3: Air Layering (For Large, Established Plants)
Air layering is the most advanced method — used to propagate a new, already-rooted cutting from an actively growing parent plant without severing it until roots are established.
Step 1: Select a healthy stem section with at least one node. Using a clean blade, make a small upward cut or remove a ring of bark approximately 1 inch wide at the node location.
Step 2: Pack moist sphagnum moss tightly around the wounded node — a generous handful.
Step 3: Wrap the moss tightly in clear plastic wrap, sealing both ends with twist ties or tape to retain moisture.
Step 4: Wait 4–8 weeks. Roots will grow into the sphagnum moss, becoming visible through the clear plastic when they’re ready.
Step 5: Once roots are clearly established and several inches long, cut the stem below the rooted section. The cutting already has an established root system — pot it directly into aroid mix.
Best use case for air layering: When you want to propagate a large, mature P. tortum without risking the mother plant or losing significant foliage during the propagation process.
13. Repotting & Root Care
When to Repot
P. tortum needs repotting every 2–3 years, or when:
- Roots are visibly growing from drainage holes
- Roots are spiraling visibly at the soil surface or inside the pot
- The plant dries out unusually fast after watering (indicating roots have displaced most of the soil volume)
- Growth has stalled despite adequate care
How to Repot
Move up 2–3 inches in diameter from the current pot — slightly more generous than the standard 1–2 inch recommendation for most plants, because P. tortum’s aggressive climbing root system fills pots relatively quickly. Use fresh aroid mix — don’t reuse old, compacted soil.
Spring repotting is ideal — the plant is entering active growth and re-establishes fastest. For the complete repotting process, see our step-by-step repotting guide.
Root-bound plants: P. tortum tolerates being slightly root-bound better than many houseplants — a mildly crowded root system doesn’t cause immediate decline. However, severely root-bound plants (roots densely circling with almost no soil remaining) do suffer reduced growth and increased stress.
The UConn Plant Database is a highly reputable academic source often cited by horticultural professionals. They provide detailed, science-based care information without trying to sell products.
14. The “Leafless Vine” Problem & The Chop-and-Prop Solution
This is one of the most common P. tortum problems that no other care guide addresses clearly.
What Is a Leafless Vine?
As P. tortum grows — especially when trailing or hanging without a climbing structure — it can send out a leafless extending vine: a stem that continues growing in length without producing any new leaves, just extending outward until it finds something vertical to climb.
Why this happens: P. tortum’s growth instinct is to climb. When hanging or trailing without a climbing structure, the plant sometimes prioritizes extending its vine to seek an anchor point rather than producing new foliar growth. The resulting leafless vine is the plant’s natural response to not having found a climbing surface.
The Chop-and-Prop Solution
The leafless vine is an opportunity, not a problem. Each section of vine with a node can be propagated — and because of P. tortum’s enthusiastic root production, even entirely leafless node sections root readily in sphagnum moss.
How to do it:
- Identify the leafless vine section.
- Cut it into 2-node sections (each piece with two nodes — extra insurance that at least one produces roots and new growth).
- Propagate in sealed sphagnum moss propagation box per Method 2 above.
- On the cut mother plant, new growth will typically emerge from the node just below the cut point — often more vigorously than before the chop.
The result: The mother plant rebounds with new, often larger growth. The cut sections become new propagations. There is no wasted material — this is the most efficient way to manage a P. tortum that has become leggy or vine-heavy.
15. Philodendron Tortum Problems: Complete Diagnosis Guide
Yellow Leaves
Cause 1 (Most Common): Overwatering — soil has been consistently too wet. Fix: Allow to dry to the 1–2 inch mark before next watering. Check drainage. If severe, check for root rot (unpot and inspect roots).
Cause 2: Natural aging — a single yellowing lower leaf on an otherwise healthy plant is normal leaf turnover. Trim and continue normal care.
Cause 3: Nutrient deficiency — particularly nitrogen, in an unfertilized plant. Fix: Begin monthly fertilization with a nitrogen-heavy fertilizer during the growing season.
Brown Leaf Tips and Edges
Cause 1: Low humidity — most common during winter heating season. Fix: Add a humidifier or move to a more humid location. Trim brown tips with clean scissors.
Cause 2: Fertilizer salt buildup — white crusting on soil surface is a confirming sign. Fix: Flush soil thoroughly with clean water to leach excess salts.
Cause 3: Cold damage from drafts. Fix: Move away from cold windows or doors.
Pale, Washed-Out, or Bleached Leaves
Cause: Too much direct sunlight. Fix: Move further from the window or filter with a sheer curtain. Bleached leaves won’t recover but new growth in the correct light position will emerge with proper color.
Slow Growth or No New Leaves
Cause 1: Insufficient light. The most common driver of stalled growth in P. tortum. Fix: Move to brighter indirect light or supplement with a grow light.
Cause 2: Root-bound — plant has outgrown its pot. Fix: Repot into a pot 2–3 inches larger with fresh aroid mix.
Cause 3: Winter semi-dormancy — reduced light and cooler temperatures naturally slow growth. Fix: Accept the winter pace. Growth resumes with increased light in spring.
Drooping or Wilting
Cause 1: Underwatering — soil is dry. Fix: Water thoroughly immediately. Plant typically recovers within hours.
Cause 2: Root rot — plant wilts despite moist soil because damaged roots can’t transport water. Fix: Unpot, examine roots, trim rotted sections, repot in fresh dry aroid mix, reduce watering significantly going forward.
Cause 3: Cold stress — temperature dropped below 55°F. Fix: Move to warmer location immediately.
Bacterial Leaf Spot
Appearance: Brown or black spots with a yellow halo. Distinct from simple browning — the halo is the diagnostic marker. Cause: Bacterial infection, typically from poor airflow and water sitting on leaves. Fix: Remove affected leaves. Improve air circulation. Water at soil level rather than overhead. Ensure leaves dry quickly if they get wet.
16. Pests: What to Watch For
P. tortum is vulnerable to the same pests that target most aroids. Thrips are the most commonly reported pest on P. tortum and related aroids in the US plant community — they target new developing leaves specifically, causing the emerging leaf to unfurl streaked or distorted.
Other common pests: mealybugs, spider mites, and scale.
For complete elimination protocols:
- Thrips: see our thrips elimination guide
- Mealybugs: see our mealybugs elimination guide
Prevention: Monthly inspection of leaf undersides and stem joints, quarantine of all new plants for 2–3 weeks before adding to your collection, and maintaining overall plant health through appropriate light, watering, and fertilization.
17. Philodendron Tortum Price Guide & Where to Buy in the USA (2026)
Price Ranges
| Form | Typical Price Range | Notes |
|---|---|---|
| Standard (green) — small/juvenile | $15–$40 | Widely available. Costa Farms, Home Depot, local nurseries |
| Standard (green) — medium | $35–$80 | Garden centers, online retailers, Etsy |
| Standard (green) — large/mature | $80–$200 | Specialist online sellers, Etsy, rare plant shops |
| Variegated — rooted cutting | $150–$400 | Etsy specialist sellers, MonsteraX marketplace |
| Variegated — established plant | $300–$800+ | Rare plant collectors, specialist retailers |
| Florida Beauty × Tortum (green) | $80–$200 | Etsy, eBay, aroid specialty sellers |
| Florida Beauty × Tortum (variegated) | $200–$500+ | Very limited availability |
Where to Buy in the USA
For standard green form (best price and selection):
- Costa Farms (available at Home Depot nationally, and directly at costafarms.com) — reliable quality, fair price
- Local nurseries and independent garden centers — inspect the plant before buying; local sourcing avoids shipping stress
- Etsy — wide selection from small-scale US growers; read reviews carefully and buy from sellers with 100+ transactions
For variegated form and rare collector plants:
- Etsy specialist sellers — the primary marketplace for variegated tortum in the US
- MonsteraX marketplace — dedicated platform for rare and variegated aroids
- Local rare plant auctions and plant swap events — increasingly common in major US cities; often the best prices for rare specimens
What to look for when buying:
- At least 2–3 healthy leaves with no yellowing, spotting, or damage
- Visible new growth (a sign the plant is actively healthy, not merely surviving)
- Well-established root system (if buying bare-root or in a clear nursery pot)
- Seller confirmation that the plant has been established for at least 4–6 weeks post-rooting (recently rooted cuttings require more careful acclimation)
18. Frequently Asked Questions
Q: Is Philodendron tortum rare? The standard green form is increasingly available at mainstream US retailers including Home Depot via Costa Farms, making it significantly more accessible in 2026 than even two years ago. It’s no longer truly “rare” in the collector sense. The variegated form, however, remains genuinely rare and commands premium pricing.
Q: How fast does Philodendron tortum grow? With good light (bright indirect or 600+ FC from grow lights), adequate fertilization, and climbing support, P. tortum is a moderate-to-fast grower — producing new leaves every 2–4 weeks during the growing season. Without good light or climbing support, growth is significantly slower.
Q: Is Philodendron tortum toxic? Yes — like virtually all Philodendron species, P. tortum contains calcium oxalate crystals that cause oral irritation, drooling, and vomiting if ingested by pets or humans. Keep out of reach of cats, dogs, and children. Contact your veterinarian or poison control immediately if ingestion occurs.
Q: Does Philodendron tortum need a moss pole? No — it doesn’t need one to survive, but it genuinely transforms the plant. A P. tortum with a moss pole produces dramatically larger, more deeply divided leaves and reaches its dramatic mature form far faster than one left trailing. If you want to see what this plant is truly capable of, provide something to climb.
Q: Can Philodendron tortum grow in low light? It tolerates lower light better than many aroids, but at the cost of slow growth, small leaves, poor leaf division development, and eventual decline over time. Bright indirect light (or supplemental grow lighting) is the condition under which this plant truly earns its reputation. See our grow lights guide for affordable ways to add light in dim spaces.
Q: What is the difference between Philodendron tortum and bipinnatifidum? Both have deeply divided leaves, but the differences are clear on close inspection. P. tortum has more narrowly and deeply cut leaf lobes with a skeletal quality; P. bipinnatifidum (now officially Thaumatophyllum bipinnatifidum) has broader lobes with lobed — not cut-to-the-midrib — margins. P. tortum also has the signature twisted/spiraling petioles that bipinnatifidum lacks. Botanically, tortum produces 2–6 inflorescences per sympodium vs. bipinnatifidum’s single inflorescence.
Philodendron Tortum Quick-Care Reference
| Factor | Requirement |
|---|---|
| Light | Medium to bright indirect; 2–3 hrs morning direct tolerated |
| Water | When top 1–2 inches dry; thoroughly |
| Humidity | 50–70% preferred; tolerates 40% with adequate watering |
| Temperature | 60–85°F; avoid below 55°F |
| Soil | Chunky aroid mix: potting soil + perlite + bark |
| Fertilizer | Monthly growing season, 3-1-2 NPK ratio preferred |
| Repotting | Every 2–3 years |
| Climbing support | Strongly recommended for mature leaf development |
| Pet Safety | ⚠️ TOXIC to cats, dogs & humans if ingested |
| Difficulty | Easy to Moderate |
| Growth rate | Moderate-fast with good light and climbing support |