
How to Make Compost at Home with Kitchen Waste (Beginner’s Guide)
Tags: composting for beginners, home composting tips, how to start composting, kitchen compost bin at home, vermicomposting at home, what to put in compost bin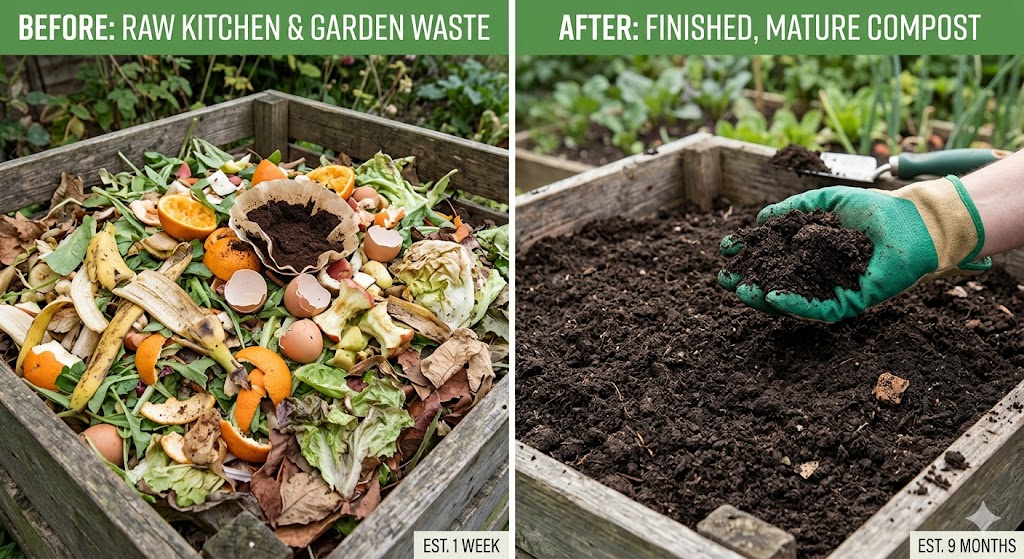
Every time you peel a carrot, brew a pot of tea, or toss a banana skin — you’re throwing away free fertiliser. Kitchen waste that ends up in the bin goes to landfill, where it produces methane, a potent greenhouse gas. But that same waste, composted at home, becomes rich, dark, crumbly compost that transforms your garden soil and costs you nothing.
Composting sounds technical. It isn’t. At its core, composting is just controlled decomposition — letting natural microbes, fungi, and small organisms break organic matter down into something plants love. You don’t need special skills or expensive equipment to start.
This guide covers everything you need to make compost at home with kitchen waste, from choosing a bin to troubleshooting common problems and knowing when it’s ready to use.
What Is Compost and Why Does It Matter for Your Garden?
Compost is decomposed organic matter — the end result of breaking down food scraps, garden waste, and other natural materials over weeks or months. Finished compost looks and smells like rich, dark soil with an earthy smell, similar to forest floor.
What compost does for your garden:
- Feeds soil microbes — healthy soil is alive with billions of microorganisms; compost is their food
- Improves soil structure — makes sandy soil retain more moisture; helps clay soil drain better
- Adds slow-release nutrients — nitrogen, phosphorus, potassium, and dozens of trace minerals in forms plants can absorb
- Suppresses disease — healthy, biologically active soil is more resistant to plant pathogens
- Reduces the need for chemical fertilisers — compost can fully replace synthetic feeds for most home gardens
Even a small amount of homemade compost makes a visible difference to plant health. A 5cm layer dug into a vegetable bed before planting can sustain crops for an entire season.
The Science Behind Composting (Simplified)
You don’t need to understand the science to compost successfully, but knowing the basics helps you troubleshoot problems when they arise.
Composting works through the activity of:
- Bacteria — the main decomposers; they break down soft materials rapidly and generate heat
- Fungi — break down tougher materials like woody stems and cardboard
- Invertebrates — worms, woodlice, beetles; they physically break materials into smaller pieces, speeding decomposition
For these organisms to thrive, your compost pile needs four things in balance:
The four essentials of composting:
1. Carbon (Browns) Dry, carbon-rich materials that provide structure and energy for microbes. Examples: cardboard, paper, dried leaves, straw, wood chips.
2. Nitrogen (Greens) Moist, nitrogen-rich materials that fuel microbial activity. Examples: kitchen scraps, fresh grass clippings, coffee grounds, plant trimmings.
3. Moisture Compost should feel like a wrung-out sponge — damp but not dripping. Too dry and decomposition stops; too wet and it turns anaerobic (smelly and slow).
4. Oxygen Aerobic bacteria (the good, fast, odourless kind) need air to work. Turning or aerating your pile regularly keeps oxygen flowing.
The golden ratio: Aim for roughly 2 parts browns to 1 part greens by volume. This keeps decomposition active without becoming smelly.
What Kitchen Waste Can You Compost?
Most kitchen waste is compostable. Here’s a clear breakdown:
✅ Kitchen scraps you CAN compost:
- Fruit and vegetable peelings — potato skins, carrot peelings, apple cores, onion skins
- Coffee grounds and paper filters — excellent nitrogen source; worms love coffee grounds
- Tea bags and loose tea — check bags are plastic-free first (most modern bags are)
- Eggshells — add calcium; crush them first to speed breakdown
- Stale bread, rice, pasta — in moderation; bury them in the centre of the pile to deter pests
- Fruit scraps — citrus peel composts fine despite the myth; just avoid adding huge quantities at once
- Vegetable tops and stalks — chop larger pieces to speed decomposition
- Paper towels and cardboard — count as browns; tear into small pieces
- Newspaper — browns; shred before adding
❌ Kitchen scraps you should NOT compost (in a standard bin):
- Meat, fish, and bones — attract rats and other pests; create strong odours
- Dairy products — cheese, milk, yoghurt; same pest and odour issues
- Cooked food with oils or sauces — fats slow decomposition and attract pests
- Diseased plant material — pathogens may survive if the pile doesn’t get hot enough
- Pet waste (cats and dogs) — may contain harmful pathogens
Note: Bokashi composting (covered later) can handle meat and dairy. For a standard compost bin, stick to plant-based kitchen waste.
Choosing the Right Composting Method
There’s no single “right” way to compost. The best method is the one you’ll actually use consistently.
Option 1: Outdoor Compost Bin
The most common approach for homes with a garden. A plastic or wooden bin sits in the garden, you add materials, and compost forms over 3–12 months.
Best for: Homes with outdoor space; processing larger volumes of kitchen and garden waste
Pros: Low cost, low maintenance, handles garden waste too
Cons: Slower in winter; not suitable for flats or homes without outdoor space
How to set up:
- Place your bin directly on soil (not on concrete) — this allows worms and other organisms to enter
- Position in a partially shaded spot — direct sun dries it out; full shade slows decomposition
- Start with a layer of browns (cardboard, dry leaves) at the base
- Add kitchen scraps regularly, covering each addition with a layer of browns
Option 2: Open Compost Heap
Similar to a bin but without the container — a freestanding pile in a corner of the garden.
Best for: Larger gardens; those with plenty of garden waste
Pros: Virtually free; easy to turn and manage; can handle high volumes
Cons: Less tidy; may need covering in heavy rain; can attract pests if not managed well
Tip: Create two heaps side by side — one “active” pile you’re adding to, one “resting” pile that’s breaking down. This produces a continuous supply of compost.
Option 3: Worm Bin (Vermicomposting)
A worm bin uses specific composting worms (red wigglers or tiger worms — not common garden earthworms) to convert kitchen scraps into extremely rich worm castings (vermicompost) and liquid feed (worm tea).
Best for: Flats and homes without garden space; small-scale kitchen waste
Pros: Compact; fast (4–8 weeks); produces highly concentrated fertiliser; odourless when balanced
Cons: Requires more attention; worms need management; can’t handle large volumes
How to set up:
- Buy or build a worm bin with drainage (commercial bins available online from around £30–£50)
- Add bedding material (torn newspaper, cardboard, coco coir) dampened to 70% moisture
- Add 500g–1kg of composting worms (available online or from fishing shops)
- Feed small amounts of kitchen scraps 2–3 times per week, burying them under the bedding
- Harvest worm castings every 2–3 months; collect worm tea from the drainage tap weekly
Avoid: Citrus, onions, and spicy foods in worm bins — worms dislike these. Also avoid overfeeding; only add new scraps once previous ones are mostly consumed.
Option 4: Bokashi Composting
Bokashi is a Japanese fermentation method that uses inoculated bran (bokashi bran) to ferment kitchen waste — including meat and dairy — in a sealed, airtight bucket.
Best for: Flats; those who want to compost all food waste including cooked food and meat
Pros: Handles all food waste; odourless when sealed; fast (2 weeks to ferment)
Cons: Fermented material still needs burying in soil or adding to a compost bin to fully break down; requires ongoing purchase of bokashi bran
How it works:
- Add food scraps to the sealed bucket in layers, sprinkling bokashi bran between each layer
- Press down to remove air and seal tightly
- After 2 weeks of fermentation, bury the fermented material in your garden or add to a compost bin
- The buried material breaks down fully in 2–4 weeks
Step-by-Step: How to Start a Kitchen Compost Bin
For most beginners, an outdoor compost bin is the easiest starting point. Here’s how to get it going from scratch:
Step 1: Choose your bin
You can buy a basic plastic compost bin from most garden centres for £20–£40, or build a simple wooden frame from pallets. A bin of 200–300 litres is sufficient for most households.
Step 2: Position it correctly
- Place directly on bare soil, not paving
- Partially shaded spot is ideal
- Keep it accessible from your kitchen — the closer it is, the more consistently you’ll use it
Step 3: Create a base layer
Before adding any kitchen scraps, lay down a 10–15cm base layer of browns: torn cardboard, dry leaves, or wood chip. This creates drainage and gives microbes a carbon foundation to work with.
Step 4: Start adding kitchen scraps
Add your kitchen scraps in batches. Each time you add greens (food scraps), cover with a layer of browns (cardboard, paper, dry leaves). This is the single most important habit to build. It:
- Prevents odours
- Maintains the carbon-to-nitrogen balance
- Stops the pile becoming a wet, compacted mass
Step 5: Keep a small caddy in the kitchen
A countertop caddy or small container with a lid means you’re not walking to the bin with every single peel. Collect scraps for a day or two, then take them out to the main bin. Most kitchen caddies hold 5–7 litres — enough for 1–2 days of scraps for a typical household.
Step 6: Turn or aerate regularly
Every 2–4 weeks, use a garden fork or compost aerator to turn the pile — moving material from the outside in and the inside out. This:
- Introduces oxygen, keeping aerobic bacteria active
- Speeds up decomposition significantly
- Helps you spot problems early (too wet, too dry, pests)
Step 7: Monitor moisture
Check your pile regularly by squeezing a handful. It should feel like a damp sponge — moist but not dripping.
- Too dry? Add water with a watering can, or add more greens
- Too wet? Add more browns and turn the pile to introduce air
How Long Does Composting Take?
This is the most common question from beginners — and the answer varies.
| Method | Time to Finished Compost |
|---|---|
| Hot composting (actively managed) | 4–8 weeks |
| Standard outdoor bin (passive) | 3–6 months |
| Open heap (large garden) | 6–12 months |
| Worm bin (vermicomposting) | 4–8 weeks |
| Bokashi (fermentation phase only) | 2 weeks + 2–4 weeks in soil |
Hot composting is the fastest method: building a large pile (at least 1m × 1m × 1m) with the correct carbon-to-nitrogen ratio and turning it every few days. The pile heats up to 55–70°C, killing weed seeds and pathogens while dramatically speeding decomposition. Requires more effort but produces compost in as little as 4–8 weeks.
Cold composting (just adding to a bin and leaving it) is slower but requires almost no effort. Most home gardeners use this approach and get usable compost in 3–6 months.
How to Know When Your Compost Is Ready
Finished compost:
- Looks dark brown to black, crumbly and uniform — no recognisable food scraps remaining
- Smells like rich, damp earth — not rotten or sour
- Feels like soft, loose soil — not sticky or slimy
- Temperature has dropped back to ambient (active piles generate heat; finished compost doesn’t)
If you can still identify food pieces, it’s not ready. Simply leave it longer. You can also sieve finished compost through a 10mm garden sieve — anything that doesn’t pass through goes back into the active pile.
Troubleshooting Common Composting Problems
Problem: My compost bin smells bad
Cause: Usually too many greens (nitrogen-rich material) and not enough browns, or too much moisture and lack of air.
Fix: Add a generous layer of cardboard or dry leaves, turn the pile to introduce oxygen, and stop adding greens for a week or two.
Problem: Nothing seems to be breaking down
Cause: Too dry, too many browns, or the pile is too small to generate heat.
Fix: Add water and more nitrogen-rich greens (fresh vegetable scraps, coffee grounds), turn the pile, and check that the bin isn’t positioned in full shade in winter.
Problem: I have fruit flies around the bin
Cause: Food scraps left exposed on the surface.
Fix: Always bury food scraps under a layer of browns when adding them. Covering the bin with a lid also helps. Fruit flies are harmless to the composting process but become annoying if the bin is near the house.
Problem: I think I have rats or mice
Cause: Meat, dairy, or cooked foods attracting pests.
Fix: Remove any animal products immediately. Make sure your bin has a solid, pest-proof base (or sits on a wire mesh base). Avoid adding bread, cooked rice, or pasta in large quantities. A secure bin lid is essential if pests are a concern.
Problem: My compost is slimy and compacted
Cause: Too wet and not enough air — the pile has gone anaerobic.
Fix: Turn the pile vigorously to introduce air, add a large amount of dry browns (cardboard works well), and if possible spread the material out to dry slightly before rebuilding.
How to Use Your Finished Compost
Once your compost is ready, there are several excellent ways to use it in your home garden:
1. Dig it into vegetable beds
Work a 5–10cm layer of compost into the top 20cm of soil before planting. This is the most direct way to improve soil fertility for food crops.
2. Use it as mulch
Spread a 3–5cm layer around the base of plants (keeping it away from stems and trunks). It suppresses weeds, retains moisture, and slowly releases nutrients as it breaks down further.
3. Mix it into potting compost
Use homemade compost as up to 30% of a potting mix for containers and raised beds. Combine with shop-bought potting compost and perlite for best results.
4. Make compost tea
Fill a bucket with water, add a few shovelfuls of compost, stir, and leave for 24–48 hours. Strain and use the liquid to water plants directly. A quick-acting, gentle liquid fertiliser.
5. Top-dress lawns
Spread a thin layer (1–2cm) of finely sieved compost across your lawn in spring to improve soil health and encourage grass growth.
Frequently Asked Questions
Q: Can I compost kitchen waste in a flat without a garden?
Yes — a worm bin or bokashi system works perfectly for flats. Worm bins are compact, odourless when balanced, and fit under a sink or on a balcony. Bokashi buckets are fully sealed and handle all food waste including cooked food. Many local councils also collect food waste for composting — check whether your area offers this service.
Q: Can I put citrus peel in compost?
Yes. The myth that citrus kills composting worms and microbes is largely unfounded. Citrus peel breaks down well in a standard compost bin. In worm bins, however, add citrus sparingly as worms do tend to avoid it in large quantities.
Q: How do I compost in winter when it’s cold?
Decomposition slows significantly in cold weather, but doesn’t stop entirely. Keep adding materials through winter — the pile will burst back into activity in spring. Insulating your bin with bubble wrap or hessian, or positioning it against a south-facing wall, helps maintain some warmth. Don’t expect finished compost in winter; think of it as building up a stock that’ll be ready by late spring.
Q: Do I need to add worms to my compost bin?
Not necessarily. Composting worms will naturally find their way into an outdoor bin sitting on soil within a few weeks. If you want to accelerate the process, you can add a handful of worms from a healthy compost bin, but it’s not required.
Q: Can I compost cooked food?
Cooked vegetables and plant-based foods can go into a standard compost bin in moderation — bury them deep in the pile to deter pests. Cooked food with meat, fish, dairy, or oils is best handled through bokashi composting rather than a standard bin.
Q: How much compost does a household produce?
A typical household generates enough kitchen waste to produce 50–100 litres of finished compost per year from a standard bin. Combined with garden waste, this can rise significantly. This is usually enough to top-dress a small vegetable bed, fill several containers, or mulch established plants.
Final Thoughts
Making compost at home with kitchen waste is one of the most impactful things you can do for your garden — and for the environment. You’re turning waste into a resource, reducing household food waste going to landfill, and producing a soil amendment that genuinely improves your garden over time.
Start simple. A basic compost bin, a kitchen caddy, and the habit of covering greens with browns is all you need. Within a few months, you’ll have dark, crumbly compost ready to enrich your vegetable beds, containers, and borders.
The key principles: balance your greens and browns, keep it moist but not wet, and turn it regularly. Get those three things right and composting takes care of itself.
Explore more on plantcarehacks.com: